8 Expert Ways How to Build a Brick Pizza Oven
The smell of damp earth after a spring thaw signals the precise window for masonry work. When the turgor pressure in surrounding vegetation is high and the soil is stable; it is the ideal time to learn how to build a brick pizza oven. Success depends on a stable foundation and thermal mass. You must calculate the structural load against the soil's bearing capacity before the first spade hits the dirt.
Materials:

Building a permanent outdoor structure requires an understanding of the site’s **Cation Exchange Capacity (CEC)** and drainage. The ideal substrate is a **friable loam** with a **pH between 6.0 and 7.0** to prevent acidic degradation of the concrete base. You will need:
* **Firebricks (Alumina content > 30%):** Essential for thermal retention.
* **Refractory Mortar:** Must withstand temperatures exceeding **2,000 degrees Fahrenheit**.
* **Crushed Stone (3/4 inch minus):** For a stable, non-heaving sub-base.
* **Insulation Board (Calcium Silicate):** To prevent heat transfer into the hearth.
* **Portland Cement and Masonry Sand:** Mixed at a **3:1 ratio** for the outer shell.
* **NPK 10-10-10 Fertilizer:** Applied to the surrounding perimeter post-construction to repair the **rhizosphere** disturbed by heavy foot traffic and equipment.
Timing:
Construction must align with USDA Hardiness Zones 4 through 9. Avoid pouring the concrete slab if the ambient temperature is projected to drop below 40 degrees Fahrenheit within a 48-hour window. This prevents the crystallization of water within the concrete matrix; which compromises structural integrity. The "Biological Clock" of your landscape dictates that heavy masonry should occur during the dormant season or early spring to minimize compaction stress on the root systems of nearby perennials. This ensures that by the time the plants reach their reproductive stage, the soil structure has recovered from the weight of the oven.
Phases:

Sowing the Foundation
Excavate a hole 8 to 12 inches deep. Fill with 6 inches of compacted gravel. Pour a 4-inch reinforced concrete slab. Ensure the slab is perfectly level using a spirit level.
Pro-Tip: Proper drainage prevents hydrostatic pressure from shifting the oven. By maintaining a slope of 1/4 inch per foot away from the structure; you protect the mycorrhizal symbiosis in the adjacent soil from anaerobic conditions caused by standing water.
Transplanting the Masonry
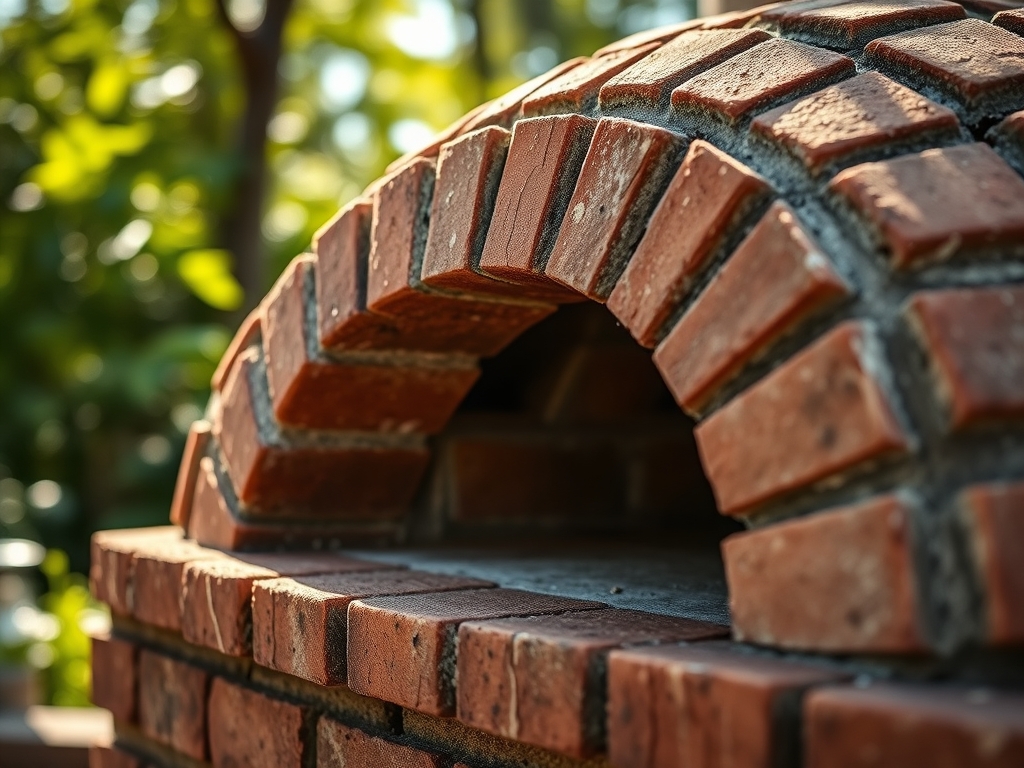
Lay the first course of firebricks in a herringbone pattern for the hearth. This pattern minimizes the catching of the pizza peel on brick edges. Use a thin layer of refractory mortar; keeping joints under 1/8 inch.
Pro-Tip: High-density firebricks act as a thermal battery. This process is analogous to phototropism in plants; where the oven "reaches" for and stores thermal energy to be released evenly during the baking cycle.
Establishing the Dome
Build a sand mold to support the arch. Lay bricks in concentric circles; angling them inward. Once the mortar cures for 72 hours; remove the sand through the oven mouth.
Pro-Tip: Allow for a slow "curing fire" over several days. Rapid heating causes thermal shock; similar to auxin suppression in plants when they are moved too quickly from shade to full sun without hardening off.
The Clinic:
Symptom: Mortar Cracking
Solution: This is often caused by rapid dehydration. Mist the masonry twice daily during the first week of curing to ensure the chemical hydration process completes fully.
Symptom: Poor Draw/Smoke Backflow
Solution: The chimney height must be at least 3 feet above the highest point of the oven dome. Ensure the oven mouth is exactly 63 percent of the dome height for optimal airflow.
Symptom: Nitrogen Chlorosis in Surrounding Grass
Fix-It: Construction dust (lime) can spike soil pH. Apply sulfur pellets and a high-nitrogen fertilizer (NPK 20-0-0) to restore the cation exchange and green the foliage.
Maintenance:
A brick pizza oven requires seasonal inspections. Use a soil moisture meter around the base to ensure the foundation isn't being undermined by erosion. Apply a silane-based sealer to the exterior every 24 months to prevent moisture penetration. If weeds or moss begin to grow in the joints of the base; use a hori-hori knife to extract the roots entirely. For any encroaching woody vegetation; use bypass pruners to maintain a 3-foot clearance to prevent fire hazards and root-related structural shifting.
The Yield:
Harvesting the heat of the oven requires patience. Once the interior dome turns white; the carbon has burned off and the bricks have reached roughly 800 degrees Fahrenheit. Use a laser thermometer to verify the hearth temperature. For "day-one" freshness in your bakes; ensure the wood used is seasoned to a moisture content of less than 20 percent. This ensures a clean burn without creosote buildup; which preserves the flavor of the crust.
FAQ:
What type of brick is best for the floor?
Use kiln-fired firebricks with high alumina content. They handle rapid thermal expansion without shattering. Standard red clay bricks will crack under the 800-degree heat required for Neapolitan-style pizza.
How long does the concrete base need to cure?
Wait at least 28 days for a full structural cure. While concrete feels hard after 48 hours; it takes nearly a month to reach its maximum PSI rating and chemical stability.
Can I build this in the winter?
Only if you can maintain a temperature above 50 degrees Fahrenheit using heaters and insulated blankets. Cold temperatures halt the chemical reaction in mortar and concrete; leading to structural failure.
Why is insulation necessary under the hearth?
Without calcium silicate board or a perlite-concrete mix; the heat will sink into the foundation. This wastes fuel and prevents the hearth from reaching the necessary temperatures for a crisp bottom crust.
How do I prevent the dome from collapsing?
Use a sand dome mold or a wooden "centering" tool. Ensure every brick is supported until the mortar has reached initial set. The keystone at the top locks the geometry in place.